Tuesday, February 26, 2013

Grandma's Birthday Card

Hello All!
I wanted to share the birthday card that I made for my Grandma. I believe she turned 83 today. I always have to make sure that I make her a Christmas & Birthday card. She loves my cards. She told me she collects them & sets them out every once in awhile. I know she talked my aunt & cousin into leaving their cards at her house a couple years ago at Christmas.


Supplies:
Lavendar Coordinations paper
Pink Paislee Artisan Elements & Chipboard
Prima Gillian White & Ameruse Duchess Mix flowers
Prima Pink Say It In Crystals
Oriental Trading Stamp
Tim Holtz Milled Lavendar & Dusty Concord Distress Markers
Tim Holtz Black Soot Distress Ink

The butterfly has a resist on it so I inked it with the marker. I colored in the scallops on the frame with marker also. I also used the distress marker on the Happy Birthday stamp. I distressed the edges of the cardstock with my Prima tool & inked it afterwards.
Have a great rest of the week!
Happy Scrappin!

Saturday, February 23, 2013

Bliss


Hi everyone! Happy Saturday! I am going to go right ahead & post my layout for Lets Get Sketchy!
Here is the sketch.


Supplies:
White Cardstock
Yellow & Aged Wine Coordinations paper
Fancy Pants Kraft Kuts Scenic Boy Paper
Pink Paislee Artisan Words(sun)
My Mind's Eye Twine & Alphabet Soup Decorative Brads
Littley Yellow Bicycle Hello Fall Chipboard Stickers
Prima Firefly Clear Stamp
Tim Holtz Squeezed Lemonade, Walnut Stain, Weathered Wood & Salty Ocean Distress Ink
Smooch Gold Pearlized Ink 

I inked the sun with distress ink & added the gold on the tips. I distressed the red banners & inked the yellow one. I used a background stamp for around the photo. I dont remember what brand it is because I bought them on a daily deal & they came in 4 packs. I dont have the packaging anymore. The stamp on the right & bottom is from Prima.  I put the animal brads at angle instead of in a row. I chose the bird because it flies like an airplane, the tiger is a land animal & has stripes like on Skylers shirt, a fish to go with the boat & water.

I better get going. Have to get ready to go to a crop. Everyone have a Great Weekend!
Happy Scrappin!


Monday, February 18, 2013

Club CK Challenges


Like I said last time, I was busy. I think I spent about 8 hours, at least, in my scrap room. I did finish my card & layout for my challenges at Club CK. My card challenge was to either emboss or stamp the background of your card. Then you have to use ink or glitter on the card. Here is my card.
I embossed it with a Cuttlebug folder & then colored in parts of it with my distress markers. I added some stickles for some sparkle. I received the flower embellishment from a swap at Club CK. Yes, I am ready to Welcome Spring.
Now for my layout challenge. I chose a sketch that I have pinned on my board, Favorite Sketches, on Pinterest. Then for something extra, you are suppose to use spray ink on the layout. Here is the sketch.

Creative Scrappers Sketch

Here is my layout for the sketch. I think this is one of my favorites layouts for the Wedding album that I am making.


Supplies:
White & Pink Cardstock, Best Creations & LYB Baby Safari paper
White mat & border- SEI Wedding kit
Pink Say It In Crystals- Prima
White Gillian & Overture B flowers- Prima
Flower Trim- BoBunny
Martha Stewart & We R Memory Keepers Lucky 8 Tatted Doily punches
Tuscan Sun & Creme De Rouge spray - Glimmer Mist
Raspberry Paint Dabber- Adirnondack


Going by the sketch, I had switched a couple things around. The borders are in front of the doily instead of behind it. I just made a title & didnt do any journaling.I also didnt have as many flowers. The big yellow & purple flowers started out white. They came from a flower trim. I cut them individually & then sprayed them with glimmer mist. The purple flower was a very light pink but did not show well so I added Adirondack Raspberry Paint to it. It made the color of the flower more closer to the color of the dresses & flowers  than just the light pink.
I hope you like this layout almost as much as I do. Pink is my favorite color though.


Happy Scrappin!

Saturday, February 16, 2013

Loving these challenges

Happy Saturday everyone! I am expecting to be hiding out in my scraproom all day today. I have much to do.
I have just completed my layout for Lets Get Sketchy & About a Boy. I hope they dont mind that I have been using 1 layout for both challenges. I dont usually have time to make all separate layouts. We are suppose to make a baby layout at About a Boy challenge. Here is the sketch.


Supplies:

Yellow & White Cardstock
Queen & Co. Trendy Tape
My Mind's Eye Decorative Brads
Spellbinders Nested Lacey Pennants
Tim Holtz Gadget Gears
EK Success All American Boy sticko stickers
Ranger Black Soot Distress Ink
Ranger Barn Door Distress Stain

The red pennants & mats for the photos were white cardstock inked with distress stain. I inked some of the edges of the pennants with black distress ink. I hand cut the longer pennants. I added the clear stickers to the pennants on the bottom of the page. I cut the gears on the Vagabond with Paper Studio textured cardstock brights that have a white core. I then used my Prima distress tool & sanded the gears so the white shows through. I added the brads in the middle of the gears & glued them down in place.
Now I have to get another layout & card done for tomorrow's challenges at Club CK.
Happy Scrappin!

Thursday, February 14, 2013

Happy Valentines Day!

Hope everyone has a Great Valentines Day! Today, I want to share my Valentines card that I made for my boyfriend of 20 years. That seems like a looong time. It does seem like forever sometimes & other days seems just like only 10 years that we have been together. LOL. Anyway, I am just babbling.
The paper background is from Paper Studio's 12x12 paper pad. The sparkly hearts, twine & heart with a key are from a Club CK peep. We exchanged in a swap. Here is my simple & cute card:

I inked the red heart with Barn Door Distress Ink. The twine is pieced in different sections. I layed out the twine across the card & gave some extra length so I could tie knots in the ends. Then glued the hearts onto the twine. I then cut a piece of twine, the same length, for each heart. I glued the twine under each heart & wrapped them around the key. I added glue to the twine to hold it in place. I stamped the inside of my card with Happy Valentine's Day.

Hope everyone has a Great Day!
Happy Scrappin!

Sunday, February 10, 2013

Late Post

I am a little behind this week. Usually I get my post done on Friday but not this week. This means I am a little late with the layout for Lets Get Sketchy. The good thing with this layout, I am able to use it for 3 different challenges.
I started this layout on Saturday with intentions for the sketch challenge & decided I would also use it for the new scrapbooking challenge blog called About a Boy.  Then the challenge for this coming week at Club CK was to place a heart & the word love on your layout. Bonus was to use washi tape. The sketch already had a heart on it so I thought I would incorporate the word love on the layout also.
Here is the sketch from Lets Get Sketchy:


 Supplies:

Black, White & Red Cardstock
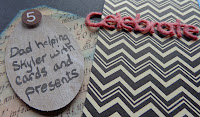
Jillibean Soup Black Salt Chevron Paper
My Mind's Eye Fine & Dandy Tickled Pink Banner Stickers
My Mind's Eye Blue Twine
Brown Cardstock Oval Tag
Felt Celebrate
Tim Holtz Harlequin Elements Grungeboard
Tim Holtz  Word Sticks
Tim Holtz Symphony Tissue Tape

Tim Holtz Barn Door Distress Stain
Tim Holtz Pine Needles Distress Ink
Tim Holtz Salty Ocean Distress Ink
Tim Holtz Picket Fence Stickles
Studio 71 White Acrylic Gesso
3D Foam Squares
Beacon 3-in-1 Liquid Glue

 I placed the foam squares behind each letter to make them stand off the banners. I inked the tag, which I made on my Cricut. I added Gesso to the brown oval tag that I received from a peep at Club CK.  I inked the felt Celebrate piece with the Distress Stain because the Distress Ink looked more pink than red. I inked the heart with Distress Ink & a blending tool. I poked a hole in the heart with my We R Memory Keepers piercing tool. I used the Sew Easy fancy floss to tie the heart & word stick together.I applied gesso to the stars & then added stickles on top of that. I placed the tissue tape on top of the red cardstock. The scallop edge was made from a friends border punch.
I have made my Valentines Card but will share it after Valentines Day.
Have a Great week & Happy Valentines Day!
Happy Scrappin!


Friday, February 1, 2013

Fantastic Friday February 1st

Wow! January just flew by. Hope the cold intends to fly by too. We had our share of cold & snow in January. I think it should start warming up now. As I type this, it is only 3 degrees & that is not with the windchill.

Lets Get on with todays post.This week was busy. I had the opportunity to teach scrapbooking to kids that are about 14yrs. old. I had signed up to teach the Parent Elective class at my son's school. No, he was not in  the class. People teach all different things for this class so the kids do not get to choose what the parents teach. In this class, there are 2 girls & 6 boys. I taught them how to make a paper bag mini album & cover it with cardstock. I will be going back next week so we can embellish the pages & I can show them some of the fun tools.
 I was hoping I would make the deadline for Lets Get Sketchy. I always try to do some scrappin on Fridays even though I should be sleeping. First things first.
 

Supplies:

-We R Memory Keepers January Snow Sewn Cardstock
 -Prima Firefly Mini Alpha Letters
-Quick Quotes Blue Striped Patterned Paper
-Prima Canvas Resist Banners & Tickets
-Prima Precious Metals Ice Leaves   
-Prima Wood Buttons
-Prima Petal Pins Iced
-My Mind's Eye Decorative Brads
 -Tattered Angels Graphite Glimmer Mist                 -Smooch Pearlized Silver Ink
-Rangers Weathered Wood Distress Ink                  -Rangers Pine Needles Distress Ink 
-Rangers Black Soot Distress Ink                      
-We R Memory Keepers Sew Easy Fancy Floss                                        


I made the title 3D with square foam dots under each letter. I cut the two different blue papers with a decorative scissors. I inked the tickets on the right until it was as dark as I wanted & could see the resist pattern.I was going to spray the paper with Glimmer Mist but I practiced first & the mister got clogged. When I tried to clean it, I realized that if I pressed the pump, it would spray through the bottom of the tube. That is how I ink blotted the paper. I added some blue fancy floss & inked the edges of the wood buttons. I have a couple packages of decorative brads so I mixed some up until I found what I liked.

Hope everyone enjoys the rest of their Friday & the weekend.

Happy Scrappin!


Hope you enjoy all my scrappy projects that comes from My Crafty Heart